Daily Maintenance
01 Water Replacement & Water Tank Cleaning (Clean the tank and replace circulating water once a week as recommended)
Note: Ensure the laser tube is fully filled with circulating water before starting the machine.Water quality and water temperature directly determine the service life of the laser tube. Purified water is recommended. Keep water temperature below 35 °C. If temperature exceeds 35 °C, replace the circulating water or add ice to cool the water. (A chiller or dual‑tank setup is highly recommended.)
Tank‑cleaning procedure:
- Power off the machine and disconnect the water‑inlet hose to let water drain from the laser tube into the water tank.
- Open the tank, take out the water pump and remove dirt and debris from the pump.
- Thoroughly clean the tank, refill with new circulating water, then reinstall the pump.
- Reconnect the pump hose to the water inlet and secure all joints.
- Power the pump independently and run it for 2‑3 minutes to fully fill the laser tube with circulating water.
02 Fan Cleaning
Long‑term operation causes solid dust buildup inside the fan, resulting in loud noise and poor fume extraction. When suction weakens and smoke venting becomes inefficient:
- Cut off power supply.
- Disconnect inlet and outlet air ducts from the fan.
- Remove accumulated dust. Flip the fan and rotate the impeller until it is fully cleaned.
- Re‑assemble the fan.
03 Lens Cleaning (Recommended before daily operation; machine must be powered off)
The laser cutter contains 3 reflective mirrors and 1 focusing lens.
- Mirror 1: Laser‑tube output, top‑left corner of machine
- Mirror 2: Left‑end of crossbeam
- Mirror 3: Top of laser‑head fixture
- Focusing lens: Adjustable lens barrel under the laser head
Laser beam is reflected and focused through these optical components. Dust and contaminants lead to power loss or lens damage.
- For Mirror 1 and Mirror 2: No removal required. Gently wipe from center toward edge in circular motions with lens paper dampened with cleaning solution.
- For Mirror 3 and focusing lens: Remove from holder, clean with the same method, then reinstall.
Notes:① Wipe gently to avoid scratching anti‑reflection coating.② Handle lenses carefully to prevent dropping.③ Install the focusing lens with concave side facing downward.
04 Guide Rail Cleaning (Every half‑month; perform with power off)
Preparation: Dry cotton cloth, lubricating oil (sewing‑machine oil recommended; do NOT use engine oil).
Linear guide rail:
Move the laser head all the way to one side. Wipe the rail with dry cloth until shiny and dust‑free. Apply a small amount of lubricant. Slide the laser head back and forth several times to spread oil evenly.
Roller guide rail:
Shift the crossbeam inward. Open side access covers. Wipe dust off contact surfaces between rails and rollers with dry cloth. Move crossbeam and clean remaining sections.
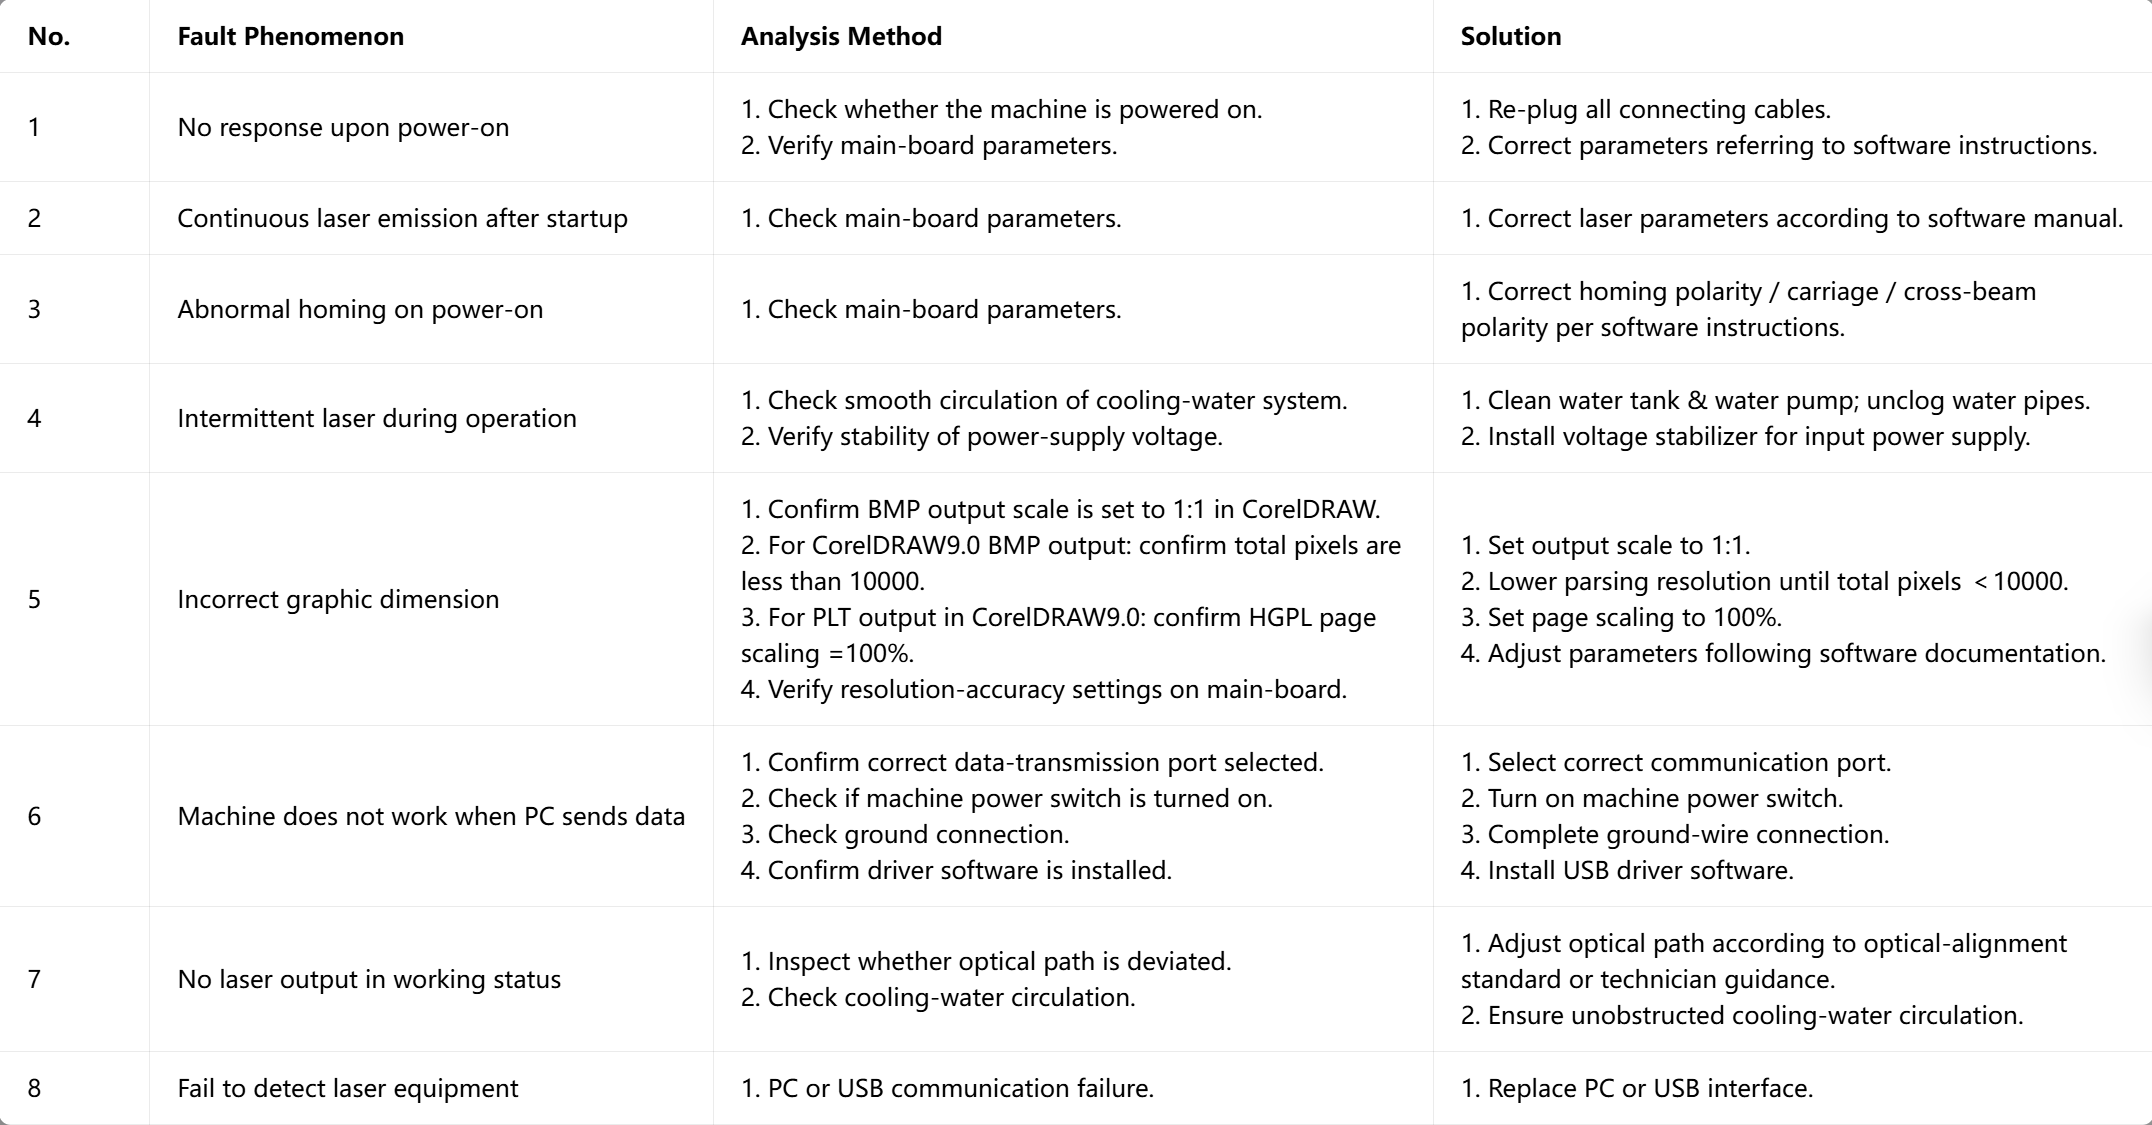
Common Fault Analysis